Reverse Proxying over WebSockets: Building a Production-Ready Local Tunnel
by Syed Sibtain, System Analyst
Introduction
Most developers take for granted the ability to share a local project with a single command. Whether it’s for demos, testing, or webhooks, we often need a quick way to expose a local server. Tools like ngrok have become the default solution for this.
I’ve used ngrok for years while working on Gather AI, a platform for automating daily check-ins for async teams, and it’s been incredibly useful.
But building a tunneling service is very different from using one. Once we try to do it ourselves, we quickly realize that the internet isn’t designed to let external traffic reach a private machine. In this post, I’ll walk through how we built a production-ready local tunneling system—why dynamic port allocation didn’t scale for us, and how we designed a reliable relay using NestJS and WebSockets.
The Problem: The "Dynamic Port" Trap
When we use ngrok or any other tunneling service, we don’t have to think about port allocation. The service dynamically assigns a port to your local server and forwards the traffic to it.
But when we build our own tunneling service, we need to think about port allocation. We need to assign a port to our local server and forward the traffic to it.
Our initial architectural goal was simple: assign a unique, random port on our server for every new tunnel (e.g., tunnel-server.com:45001 maps to localhost:3000).
However, this approach hit two major walls quickly:
- Provider Restrictions: Modern PaaS providers like Fly.io are optimized for standard web traffic (80/443). Exposing thousands of arbitrary ports is either impossible or a configuration nightmare.
- Network Friction: Many corporate firewalls block non-standard ports, rendering the service useless for developers in restricted environments.
The Pivot: We realized that instead of opening more "doors" (ports), we needed to multiplex data through a single "hallway." By using a persistent WebSocket connection on port 8080, we could tunnel multiple virtual requests through a single standard HTTPS connection.
Architecture Overview: The Three-Tier Design
Tier 1: Tunnel Server (NestJS Backend)
The server acts as the central orchestrator, handling:
- HTTP Request Routing: Intelligently routing external requests to connected clients
- WebSocket Management: Maintaining persistent connections with tunnel clients
- Tunnel Lifecycle: Creating, tracking, and cleaning up tunnel connections
- Multi-Protocol Support: Handling both HTTP and WebSocket upgrades
Tier 2: Tunnel Client (CLI Application)
The client is a lightweight CLI tool that:
- Auto-Allocation: Requests tunnel creation from the server
- WebSocket Bridge: Establishes persistent WebSocket connection
- HTTP Proxying: Forwards external requests to the local development server
- Connection Management: Handles reconnection and error scenarios
Tier 3: Local Development Server
The application being tested (e.g., a Rails, Next.js, or any other application) running on our local machine which we want to expose to the internet.
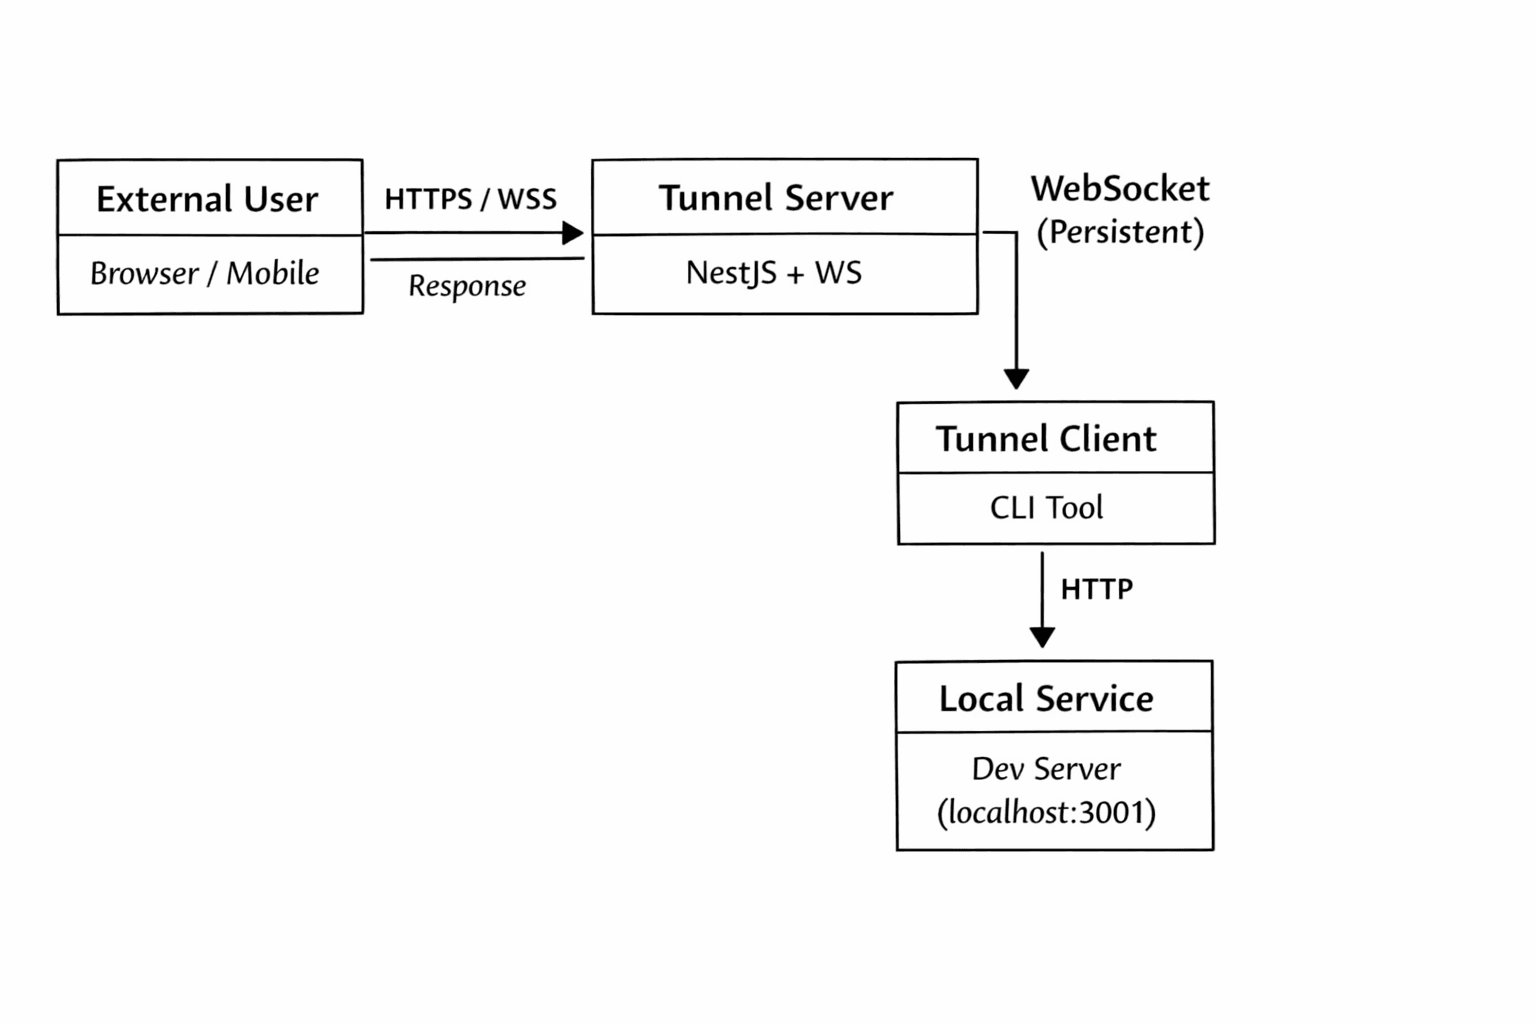
How a Request Travels Through the Tunnel
To make this easier to understand, let’s follow a single request from the browser to a local machine.
-
External User → Tunnel Server (HTTPS)
A user visits a URL likehttps://demo.tunnel.c9s.dev.
The request first hits the tunnel server over standard HTTPS, before NestJS routing is applied. -
Subdomain Resolution
The hostname (demo.tunnel.c9s.dev) contains a subdomain (demo) that uniquely identifies an active tunnel client.
The server maps this subdomain to a connected WebSocket session. -
Tunnel Server → Tunnel Client (WebSocket)
Instead of forwarding the request over a raw TCP port, the server serializes the HTTP request and sends it over an existing, persistent WebSocket connection. -
Tunnel Client → Local Service (HTTP)
The tunnel client receives the request and forwards it to the local development server (for example,localhost:3001). -
Response Path (Reverse Direction)
The response flows back the same way:
local service → tunnel client → WebSocket → tunnel server → external user.
From the browser’s perspective, this behaves like a normal HTTP request. But behind the scenes, it’s being proxied over a persistent WebSocket connection.
The Implementation: Server Architecture with NestJS
Now that we have some basic understanding of how requests flow through the tunnel, let's dive into the actual implementation.
The tunnel server is built using NestJS, but it doesn’t rely entirely on NestJS’s default request lifecycle. To support subdomain-based routing and custom proxying, we need to intercept incoming HTTP requests before they reach the framework’s routing layer.
Bootstrap Process: HTTP Request Interception
The foundation of our server is intercepting HTTP requests before they reach NestJS's standard routing system:
TypeScript
// apps/tunnel/src/main.ts
async function bootstrap() {
  const app = await NestFactory.create(AppModule);

  // Access the underlying Node.js HTTP server
  const server = app.getHttpServer();

  // Capture existing NestJS request handlers
  const originalListeners = server.listeners("request");
  server.removeAllListeners("request");

  // Intercept all incoming HTTP requests
  server.on("request", (req: IncomingMessage, res: ServerResponse) => {
    const hostname = req.headers.host;

    // Handle subdomain-based tunnel routing
    if (hostname) {
      const subdomainClientId =
        proxyService.getClientIdFromHostname(hostname);

      if (subdomainClientId) {
        proxyService.handleRequest(req, res);
        return;
      }
    }

    // Fallback to the original NestJS request handlers
    originalListeners.forEach((listener) => {
      if (typeof listener === "function") {
        listener.call(server, req, res);
      }
    });
  });
}
Why This Approach?
NestJS middleware and guards run after the framework has already committed to a route. Although this works well for a normal web application, in a tunneling system routing decisions must be made before any controller logic runs.
By intercepting requests at the HTTP server level, we gain full control over:
- Early request routing — Decide whether a request belongs to a tunnel or the main API
- Subdomain resolution — Map hostnames to active tunnel clients
- Framework isolation — Keep tunnel logic separate from normal NestJS controllers
- Safe fallback behavior — Non-tunnel traffic continues through standard NestJS routing
Subdomain-Based Routing Logic
Once an incoming request is intercepted, the next step is determining which tunnel client should receive it. We encode this information directly into the request’s hostname using subdomains.
For example, demo.tunnel.c9s.dev maps to demo as the subdomain. This subdomain uniquely identifies an active tunnel client.
To support this, we need to implement a function that can extract the subdomain from the hostname. The routing logic lives inside the proxy service and focuses on one responsibility: Given a hostname, return a valid tunnel client ID or null.
TypeScript
// apps/tunnel/src/proxy/services/proxy.service.ts
getClientIdFromHostname(hostname: string): string | null {
  const hostWithoutPort = hostname.split(":")[0];

  // Handle Fly.io managed domains
  if (hostWithoutPort.endsWith(".fly.dev")) {
    const parts = hostWithoutPort.split(".");
    if (parts.length >= 4) {
      return parts[0]; // Extract subdomain from fly.dev domains
    }
  }

  // We also handle custom domains beyond fly.dev
  if (process.env.DOMAIN) {
    const domain = process.env.DOMAIN;
    if (hostWithoutPort.endsWith(domain)) {
      const prefix = hostWithoutPort.slice(0, -domain.length - 1);
      if (prefix && !prefix.includes('.')) {
        return prefix;
      }
    }
  }

  // General-purpose subdomain parsing
  const subdomain = this.tld.getSubdomain(hostWithoutPort);
  return subdomain;
}
This approach allows the system to:
- Support multiple domain patterns Works with managed platforms like Fly.io as well as custom domains.
- Avoid brittle parsing Uses the tldjs library to correctly handle complex TLDs (e.g., .co.uk).
- Handle edge cases safely Returns null when no valid subdomain exists, preventing accidental routing.
- Keep routing deterministic Every valid subdomain maps to exactly one tunnel client.
If no tunnel ID can be resolved, the request is treated as a normal HTTP request and passed back to NestJS’s standard routing layer.
WebSocket Connection Management
Once the server can identify which tunnel client should receive a request, it still needs a reliable way to communicate with that client. This is handled through persistent WebSocket connections, which act as the transport layer between the tunnel server and tunnel clients.
WebSocket connections are managed at the HTTP server level, separate from standard HTTP routing. This allows the tunnel server to handle connection upgrades explicitly and keep long-lived connections independent of NestJS controllers.
Handling WebSocket Upgrades
Tunnel clients establish a WebSocket connection to a dedicated endpoint that includes their tunnel identifier. This makes the connection both explicit and verifiable.
TypeScript
// apps/tunnel/src/main.ts
server.on("upgrade", (req, socket, head) => {
  const reqUrl = req.url || "";

  // Tunnel client connection: /_ws/:id
  if (reqUrl.startsWith("/_ws/")) {
    const parts = reqUrl.split("/");
    const tunnelId = parts[2];

    const client = tunnelId
      ? clientManager.getClient(tunnelId)
      : undefined;

    if (!client) {
      socket.write(
        "HTTP/1.1 404 Not Found\r\nContent-Length: 0\r\n\r\n"
      );
      socket.destroy();
      return;
    }

    wss.handleUpgrade(req, socket, head, (ws) => {
      client.attachWebSocket(ws);
    });

    return;
  }
});
Why This Design?
This approach keeps WebSocket handling explicit and predictable:
- Dedicated endpoints: Tunnel clients connect via a clear, well-defined path (/_ws/:id), making intent obvious.
- Early validation: The server verifies the tunnel ID before upgrading the connection, preventing orphaned or unauthorized sessions.
- Clean lifecycle management: WebSocket connections are attached directly to an in-memory client representation.
- Fail-fast behavior: Invalid tunnel IDs receive a proper HTTP response and are immediately closed.
By handling upgrades manually, the tunnel server maintains full control over how connections are established and associated with active tunnels.
Request Handling and Proxying
Once a request has been routed to a tunnel client and a WebSocket connection is available, the server’s responsibility is to bridge HTTP and WebSocket semantics.
At a high level, this means:
- Converting an incoming HTTP request into a WebSocket message
- Sending it to the correct tunnel client
- Waiting for a response
- Translating that response back into HTTP
Validating the Tunnel Connection
Before proxying a request, the server verifies that the tunnel client is still connected. If the WebSocket is unavailable, the request fails fast with a 502 response. This ensures that requests are never queued or buffered indefinitely when a tunnel client is offline.
TypeScript
// apps/tunnel/src/tunnel/services/client.service.ts
async handleRequest(
  req: http.IncomingMessage,
  res: http.ServerResponse
) {
  if (!this.ws || this.ws.readyState !== WebSocket.OPEN) {
    res.statusCode = 502;
    res.end("Tunnel not connected");
    return;
  }
}
Serializing the HTTP Request
WebSockets operate on discrete messages, not streams. To forward an HTTP request safely, the server must serialize all request data into a structured payload.
TypeScript
  const body = await this.readBody(req);
  const reqId = randomUUID();

  const payload = {
    type: "request",
    id: reqId,
    method: req.method,
    path: req.url,
    headers: req.headers,
    body: body.toString("base64"),
  };
Each request includes:
- A unique request ID for correlation
- HTTP metadata (method, path, headers)
- A base64-encoded body to safely transport binary data
This turns the WebSocket connection into a virtual transport layer for HTTP.
Correlating Responses
Because multiple requests can be in flight over a single WebSocket connection, responses must be matched back to their originating requests.
This is handled using a promise-based correlation map with timeout protection.
TypeScript
const responsePromise = new Promise<ResponseMessage>((resolve, reject) => {
  const timeout = setTimeout(() => {
    if (this.pending.has(reqId)) {
      this.pending.delete(reqId);
      reject(new Error("Request timeout"));
    }
  }, 30000);

  this.pending.set(reqId, {
    resolve: (payload) => {
      clearTimeout(timeout);
      resolve(payload);
    },
    reject: (err) => {
      clearTimeout(timeout);
      reject(err);
    },
  });
});
If a response is not received within 30 seconds, the request is rejected and cleaned up automatically.
Sending the Response Back to the User
Once the tunnel client responds, the server reconstructs the HTTP response and sends it back to the external user.
TypeScript
try {
  this.ws.send(JSON.stringify(payload));
  const resp = await responsePromise;

  res.writeHead(resp.statusCode || 200, resp.headers);
  res.end(Buffer.from(resp.body || "", "base64"));
} catch (err) {
  res.statusCode = 502;
  res.end("Tunnel response error");
}
From the browser's perspective, this behaves exactly like a normal HTTP request. All tunneling logic remains fully transparent.
Key Takeaways
- HTTP requests are serialized and multiplexed over a single WebSocket
- Each request is independently correlated using a UUID
- Timeouts prevent hanging requests and memory leaks
- Errors fail fast and surface clearly to the caller
Tunnel Client Responsibilities
The tunnel client is responsible for the other half of the bridge. It runs on the developer's machine and acts as a local HTTP proxy, translating WebSocket messages back into HTTP requests.
Establishing the WebSocket Connection
When the tunnel client starts, it:
- Requests tunnel creation from the server
- Receives a tunnel ID
- Establishes a persistent WebSocket connection to:
/_ws/:tunnelId
This single outbound connection is firewall-friendly and works reliably across most network environments.
Receiving and Forwarding Requests
When the client receives a request message over WebSocket, it:
- Decodes the payload
- Reconstructs the HTTP request
- Forwards it to the local development server (e.g., localhost:3001)
Conceptually, the flow looks like this:
WebSocket message → HTTP request → Local server
The local server is never exposed to the internet directly. All traffic flows through the tunnel client.
Sending Responses Back
Once the local service responds, the tunnel client:
- Captures the response status, headers, and body
- Encodes the body as base64
- Sends a response message back over WebSocket using the same request ID
This symmetry allows the server to deterministically match responses to requests.
Handling Failures Gracefully
The tunnel client is also responsible for handling local failures, such as:
- The local service being offline
- Connection resets
- Timeouts
In these cases, the client sends an error response back to the server, allowing it to return a proper 502 response instead of hanging.
Why This Design Works
- Single outbound connection — no inbound ports required
- Stateless local services — the tunnel client handles all proxy logic
- Symmetric protocol — request/response semantics preserved end-to-end
- Clear failure boundaries — local and remote errors are isolated
Together, these properties allow the tunnel to behave like a normal HTTP service externally, while remaining entirely outbound-only internally.
Conclusion
Building a tunneling service turned out to be far less about forwarding traffic and far more about working within real-world infrastructure constraints. Dynamic ports don't scale well on modern platforms, and reliable tunneling requires treating the network as hostile by default.
By pivoting to a WebSocket-based relay, we were able to multiplex HTTP traffic over a single, persistent connection that works across cloud providers, firewalls, and restricted environments. The result behaves like a normal HTTP server to external users while keeping local services completely private.
This approach isn't free of tradeoffs, and I am still learning more about the best practices for building a production-ready tunneling service. But it provides a solid, production-ready foundation for exposing local services safely and predictably. I will be writing more about the tunnel client in a future post.
This work was done alongside Yuva, our founder, and started by one of my teammates. Building this together helped shape many of the architectural decisions discussed here.
Thank you for reading!
References: